
Customer Forms: Build an Intake Form
9 min read · Beginner · Core CRM
Every business has the same little chore. Someone wants to get in touch, they send an email, and a teammate retypes it into the CRM. Customer Forms takes that chore off your plate. You build a form once, customers fill it in without logging in, and their answers land in Coeffection as a record, with the right fields filled in and an owner on it.
This guide builds an intake form for a made-up bike shop called Harbor Bikes. You will create the form, decide what happens when someone submits it, add fields, publish it, and watch the first answers arrive. Then you will see the second way to use a form: a private link you send from a record.
Create the form
Open Admin → Forms and click New Form. Give it a Name that describes what it is for, like “Customer Intake.” The Slug fills itself in from the name, and you can add a Description if you like. Click Create and the form editor opens. The new form starts as a Draft, so nobody outside your team can see it yet.
Pick the slug with care
The slug becomes part of the form's web address, and it is locked once the form exists. You can't change it later. Use lowercase letters, numbers, hyphens, and underscores, and start with a letter.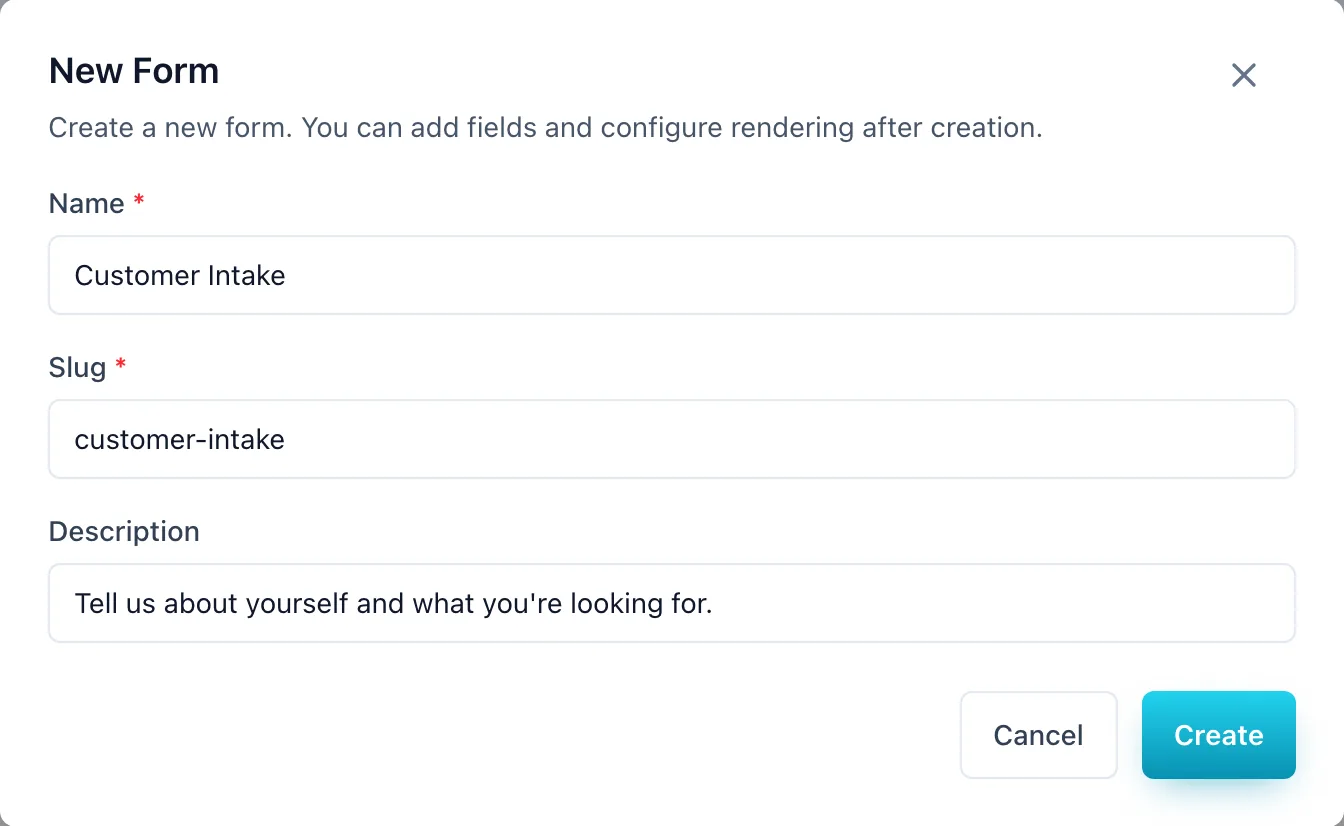
Decide who can fill it in and what happens next
Before you add any fields, open the Settings tab. Under Form options, the Audience and action tab asks two questions.
Audience is who can open the form. For an intake form, choose Public (anyone with the link). The other choices are Magic link (tied to one record), which you will meet in step 9, and Staff only.
Action is what happens when someone submits. Choose Create a record, pick the Record type (we are using Lead), and choose a Default owner, the teammate who will follow up on every new record. Then click Save changes.
Set this first
The audience and action decide which field types you can use and which record fields an answer can be saved to, so set them before you add fields. If you only want to keep the answers and don't need a record, choose Just collect responses instead.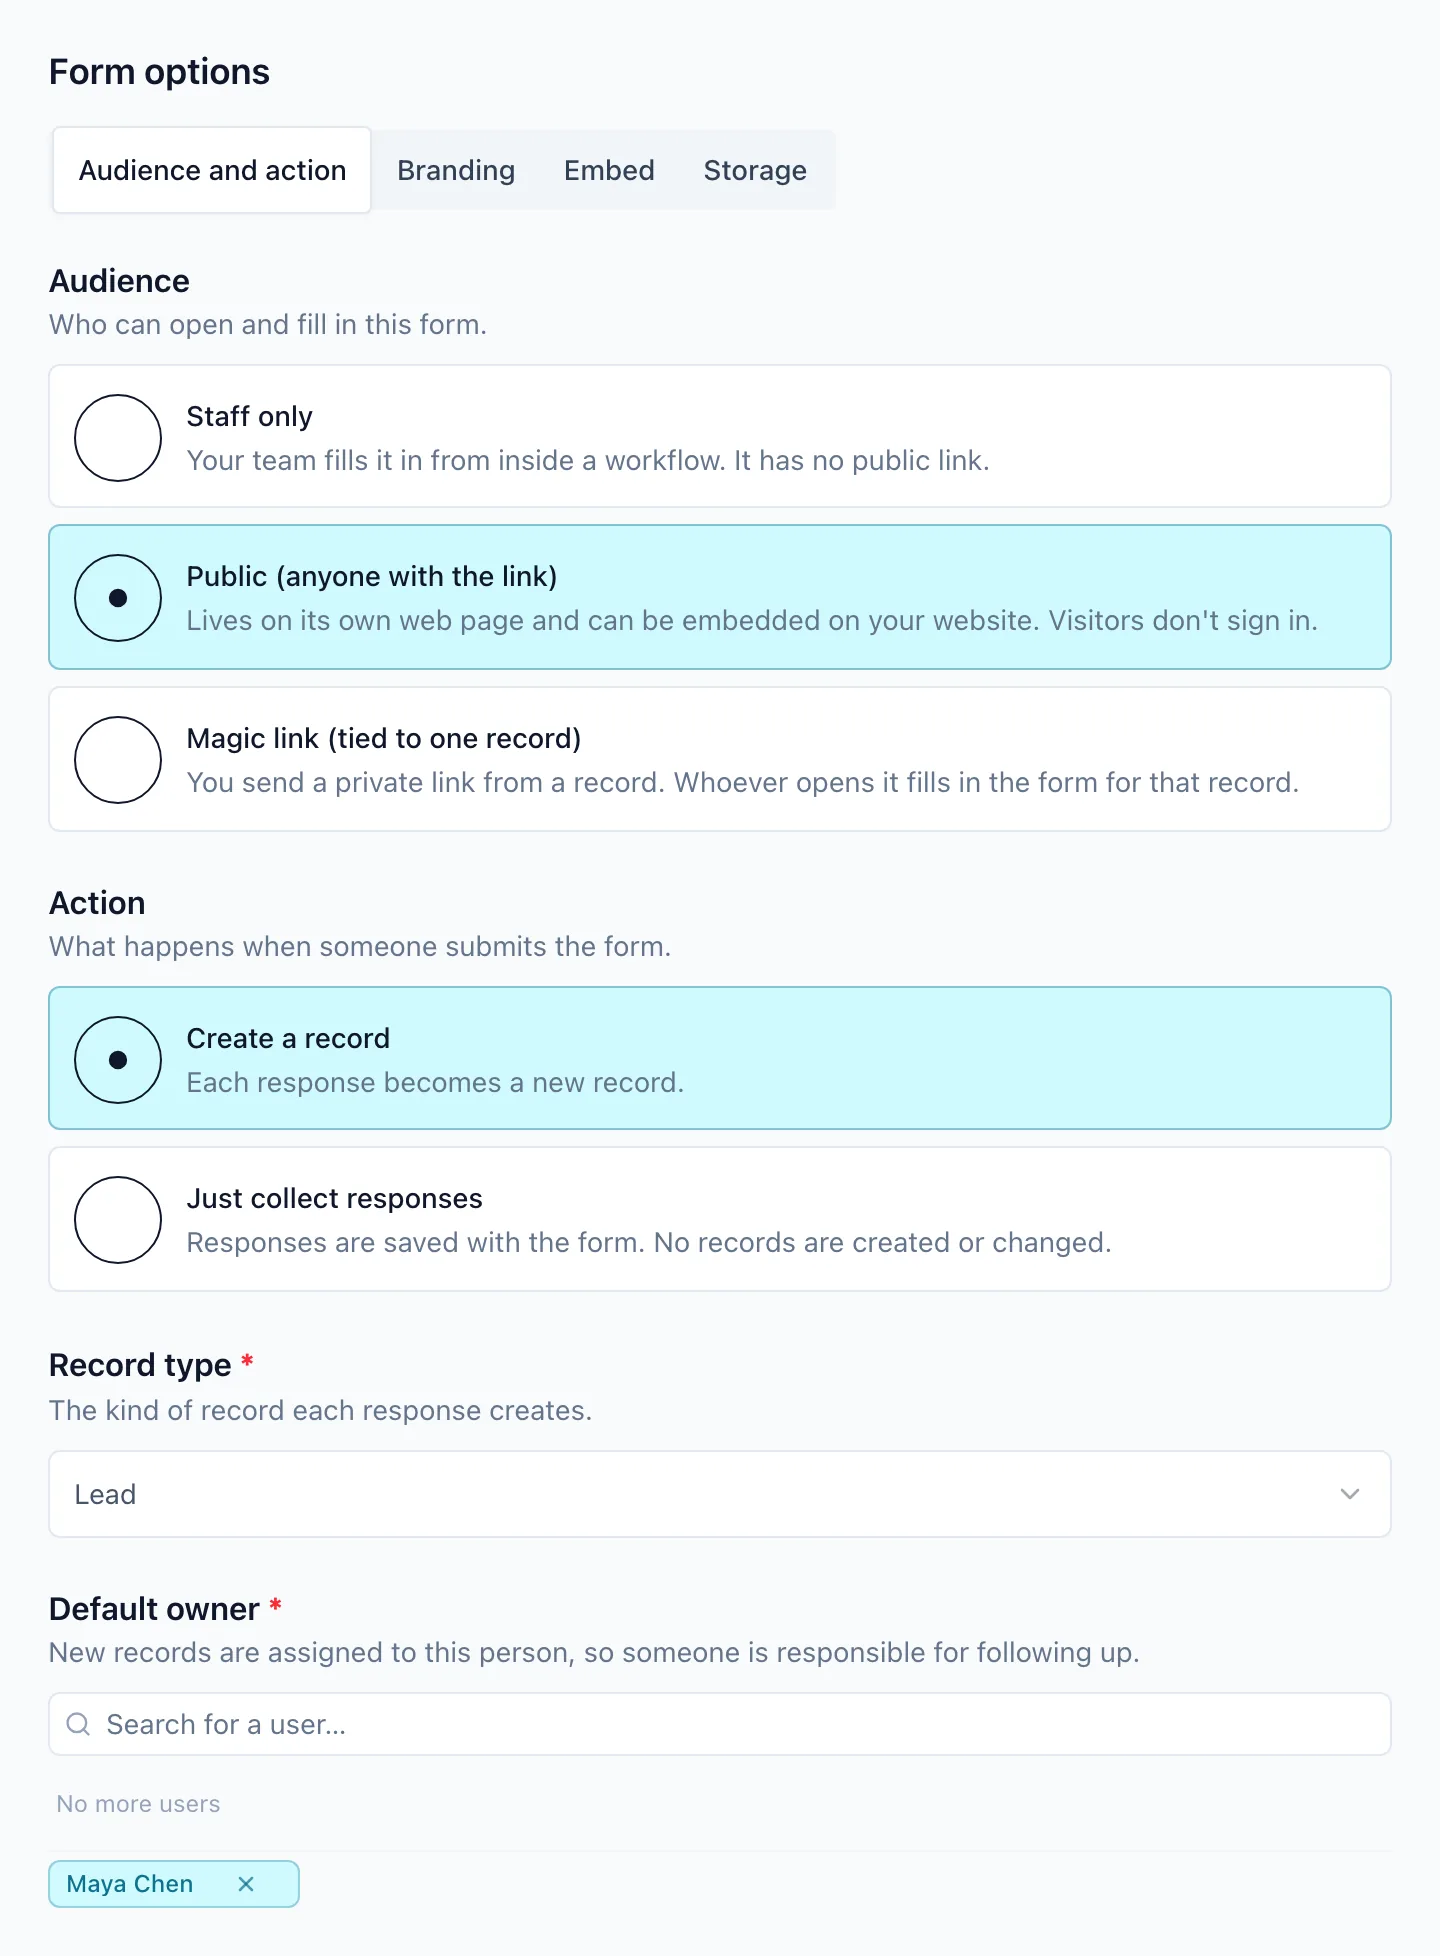
Add your fields
Switch to the Schema tab and click Add field. Give each field a Label (the question customers see), a Key (a short internal name, like full_name), and a Type. For Harbor Bikes that is a name, an email address, a phone number, a choice question, and a long-text box for anything else. For a Select field you also add the options people can pick from. Each option has a value, which is what gets saved, and a label, which is what customers see.
Click the arrow on a field's row to open it. There you can turn on Required and, if a question only matters sometimes, click Add a rule to show it only when an earlier answer says so. Drag the handle on the left of a row to put the fields in order.
Plan your keys before you publish
Once a form is published, each field's key and type are locked. You can still change labels, options, whether a field is required, and where its answer is saved.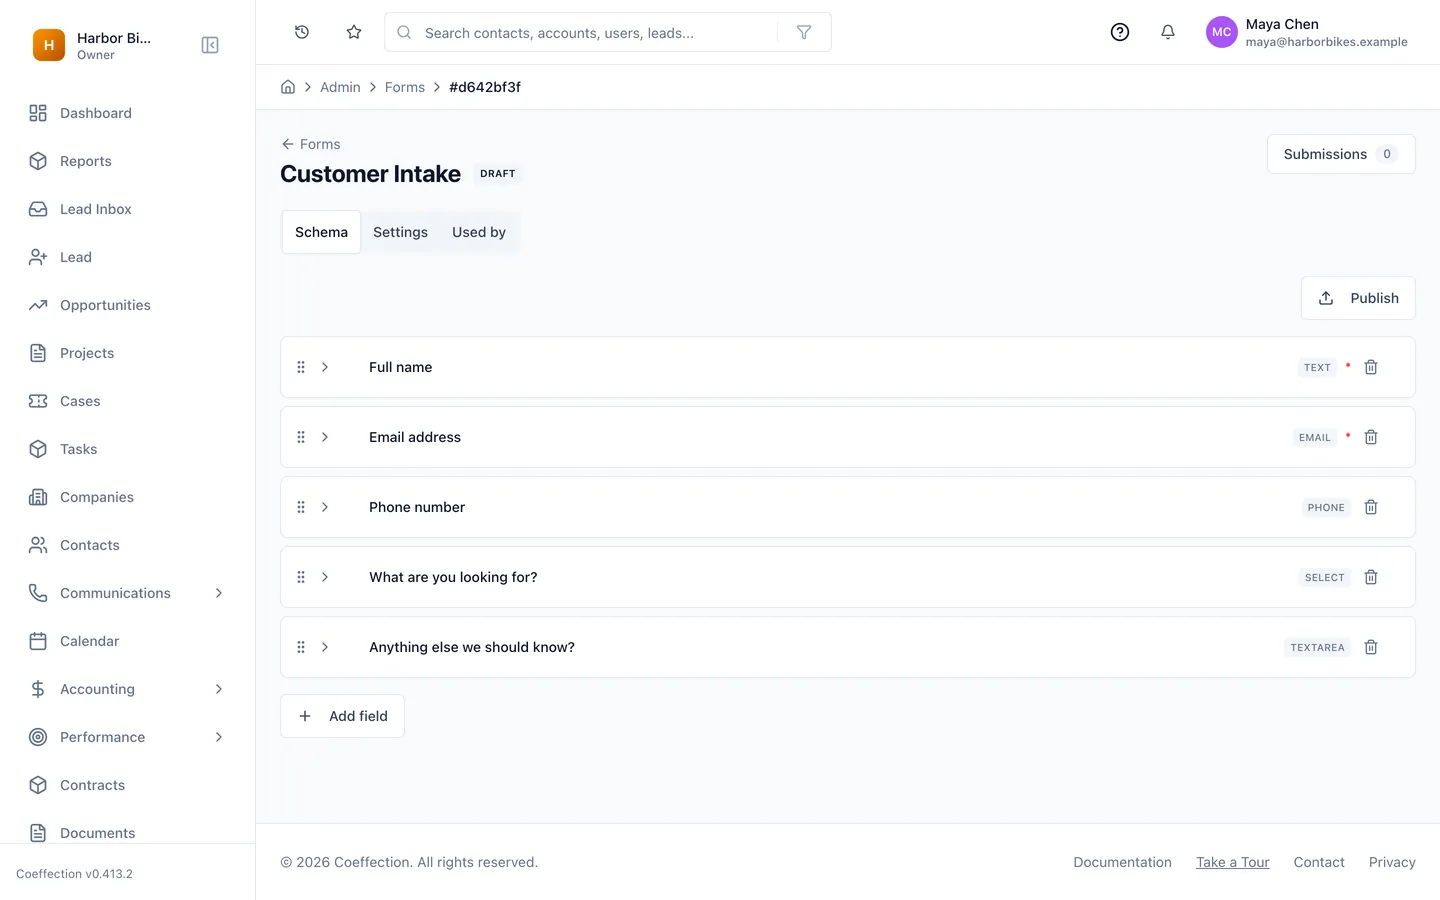
Save answers into your CRM fields
This is the step that sends answers straight into your CRM. Open a field and find Save to record field. Choose the field on the record that should receive the answer. At Harbor Bikes, “Full name” goes to Record name, which becomes the name of the new Lead. “Email address” goes to the Lead's email, “Phone number” to its phone, and the long-text box to its notes. The menu only offers record fields that can take that kind of answer.
A field you leave on Don't save to the record is still kept with the submission, so you can read it later. It just doesn't land on the record.
One answer per record field
A record field can be filled by one form field at a time. If another field already uses it, you will see Used by and that field's name. And if no field is saved to Record name, each new record is named after the form and the date.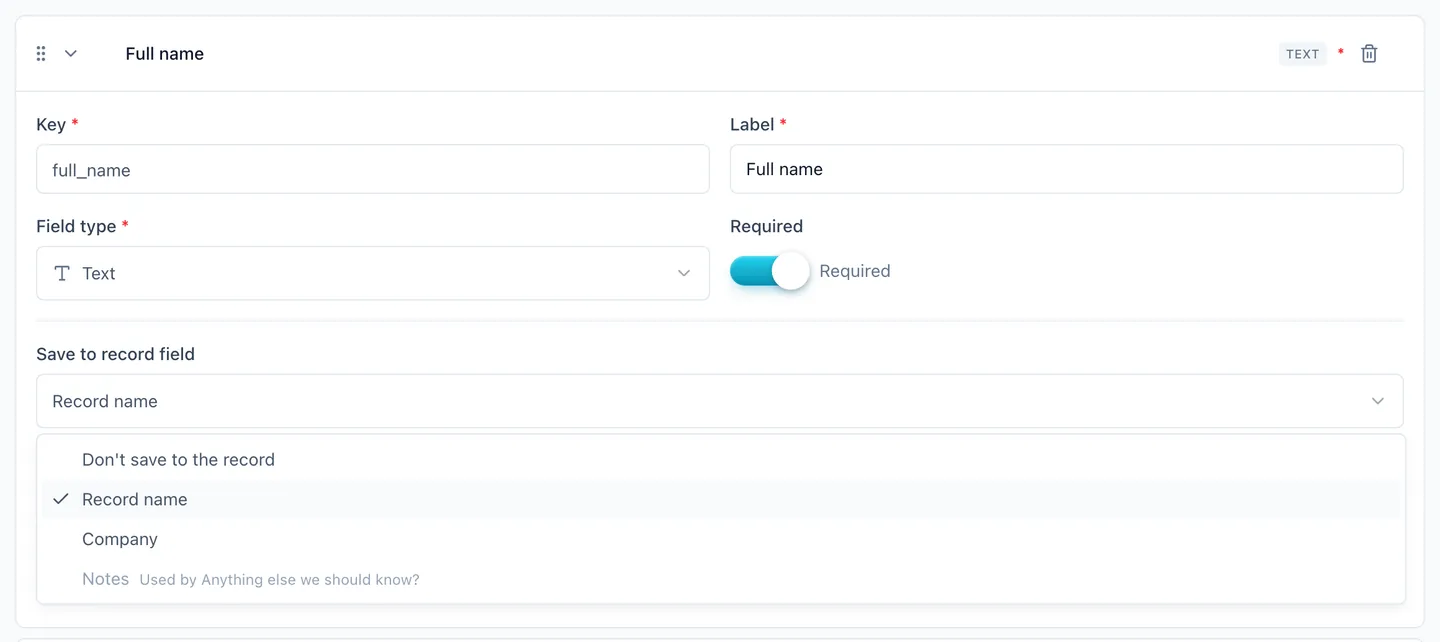
Optional: let customers upload files
Want a photo or a document along with the answers? File upload fields save what customers upload to your own Dropbox, in a folder you choose, so they need a one-time setup. Open Admin → Forms and click Storage. Under 1. Connect a storage provider, click Connect Dropbox. Then, under 2. Choose the root folder, pick the folder where customer files should go and click Save. The page will say File uploads are on. The screenshot shows how it looks before you connect.
Until that is done, file upload fields show a Needs storage tag in the field picker, and a form that has one can't be published. A response can include up to 10 files of up to 25 MB each.
Dropbox only, for now
Dropbox is the only place form uploads can go today. Google Drive shows as Coming soon. Files are not virus scanned, so only open files you expect.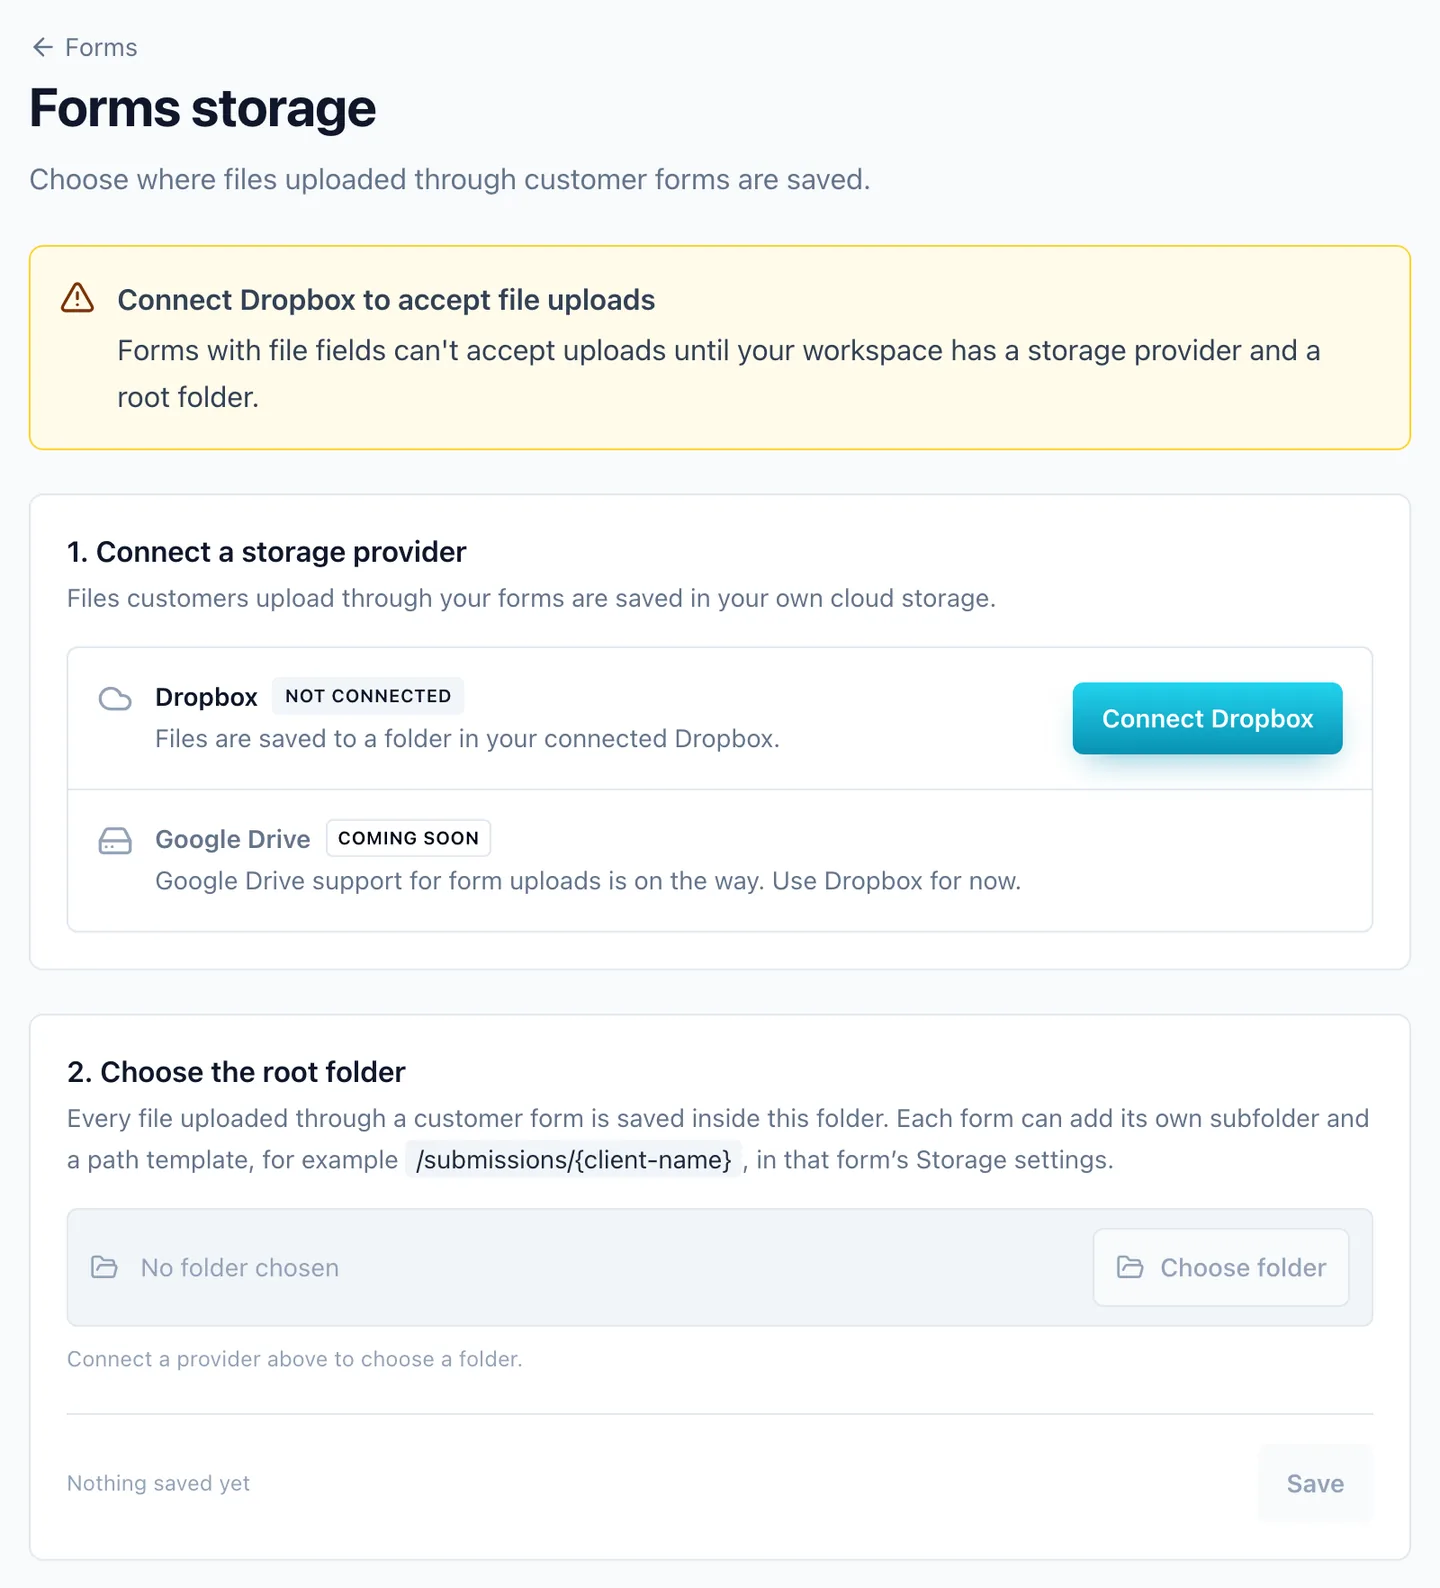
Publish it and share the link
Back on the Schema tab, click Publish. (After the first time, the button reads Publish changes.) Coeffection checks the whole form first, and if something needs fixing it lists each problem with a Go to field button that jumps straight to it.
Once the form is published, open Settings → Form options → Embed. The Hosted page link is a web page just for this form. Click Copy and share it anywhere, and visitors don't need to sign in. To show the form inside your own website instead, add the site's address under Sites that can embed this form, click Save changes, and paste the Embed code where the form should appear.
Edit freely, publish when ready
Customers always see the latest published version, never your draft edits. Change whatever you like, then click Publish changes when you want customers to see it.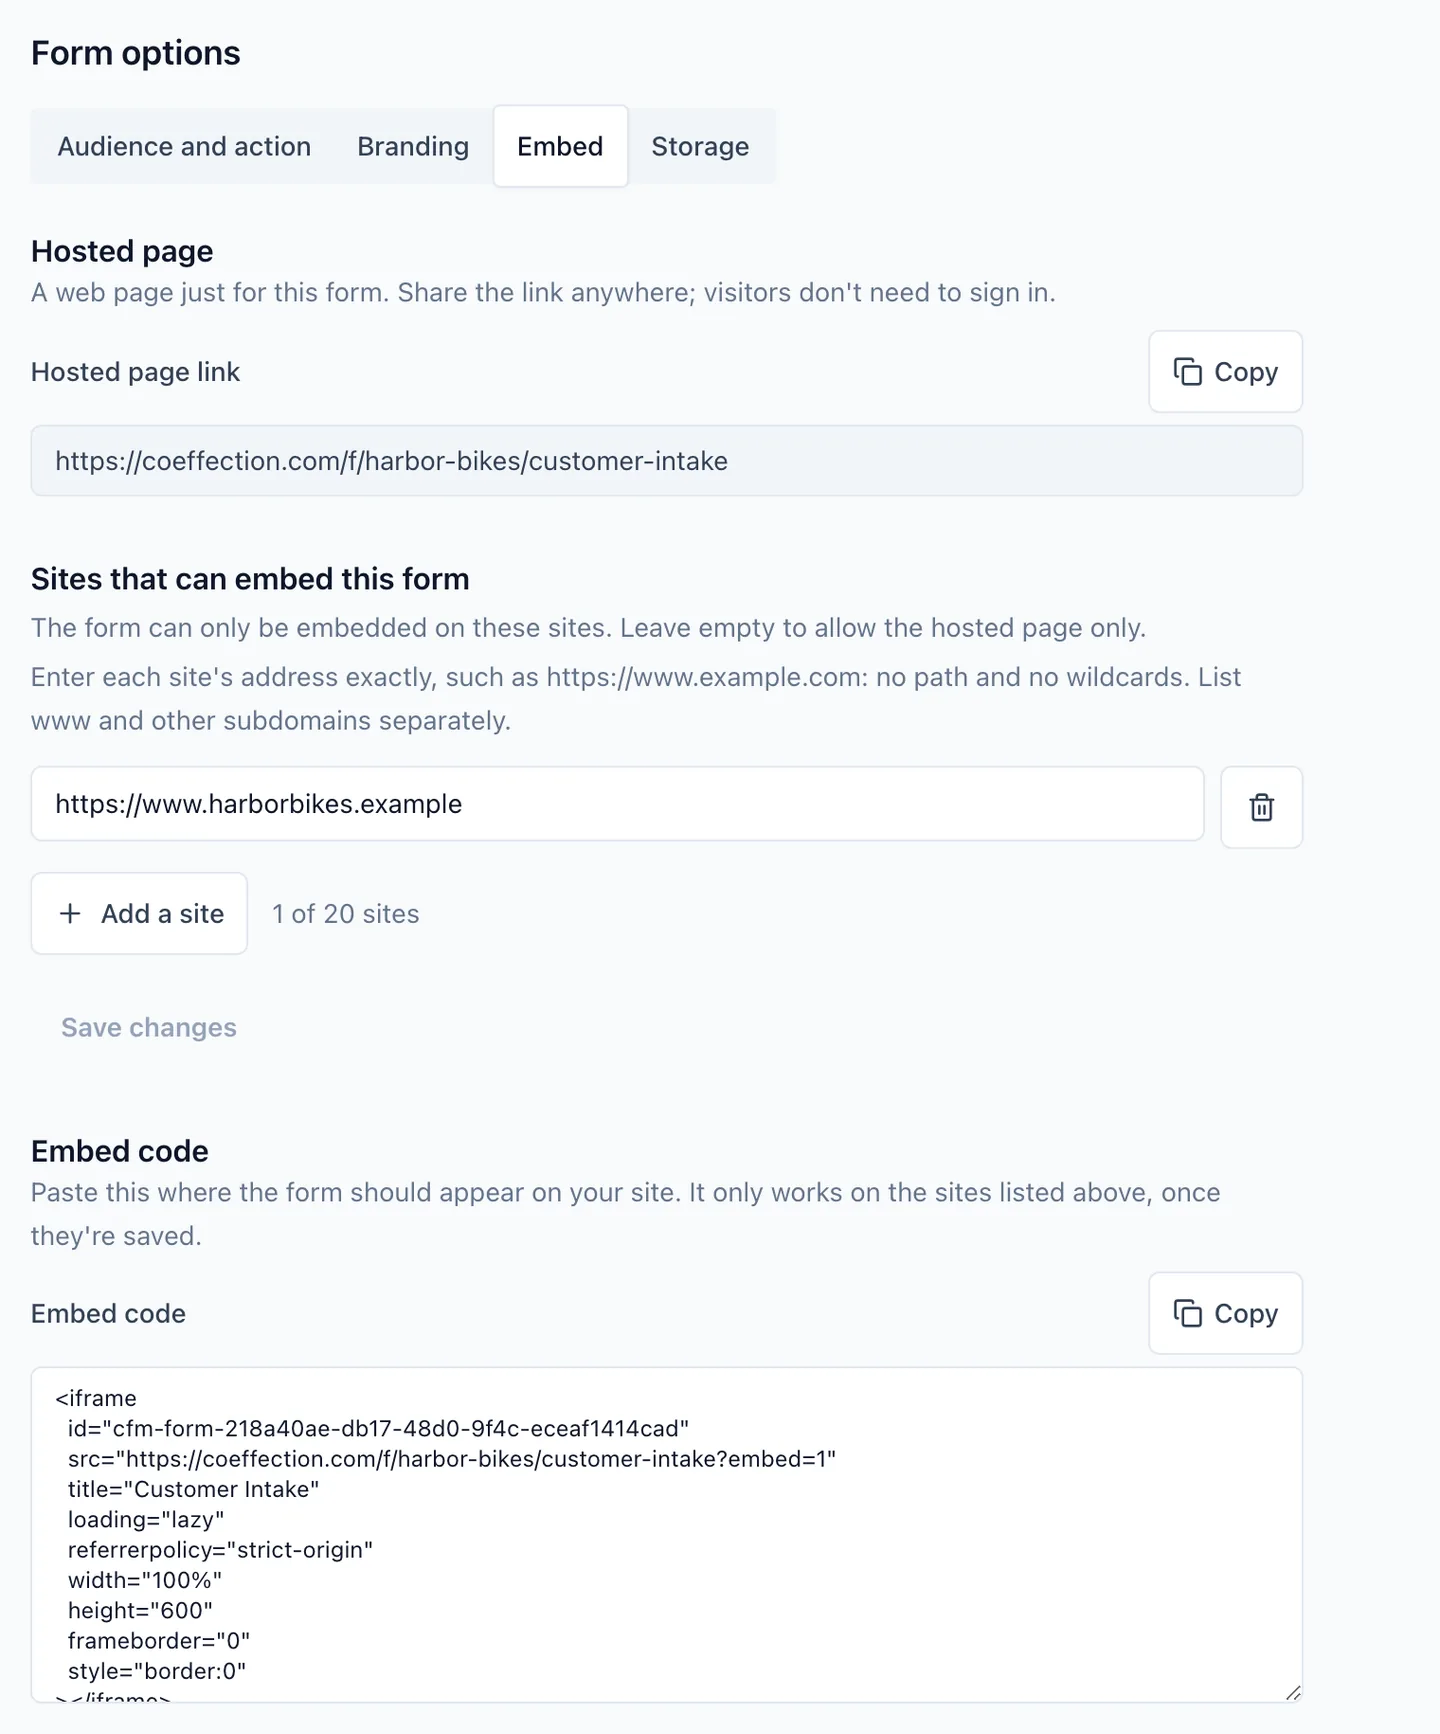
See it the way your customer does
Open the hosted page link in a private window and you see exactly what a customer sees: your headline, a short intro, the questions, and a Submit button. There is no login and nothing to install, and it fits a phone as well as a desktop. Fill it in as a test customer and click Submit. They see your thank-you message, and their answers are on their way into Coeffection.
Spam protection is built in
A quick bot check runs when someone opens the form, so there is nothing for you to set up. The headline and intro at the top come from Form options → Branding, where you can also add your logo and accent color and choose what customers see after they submit.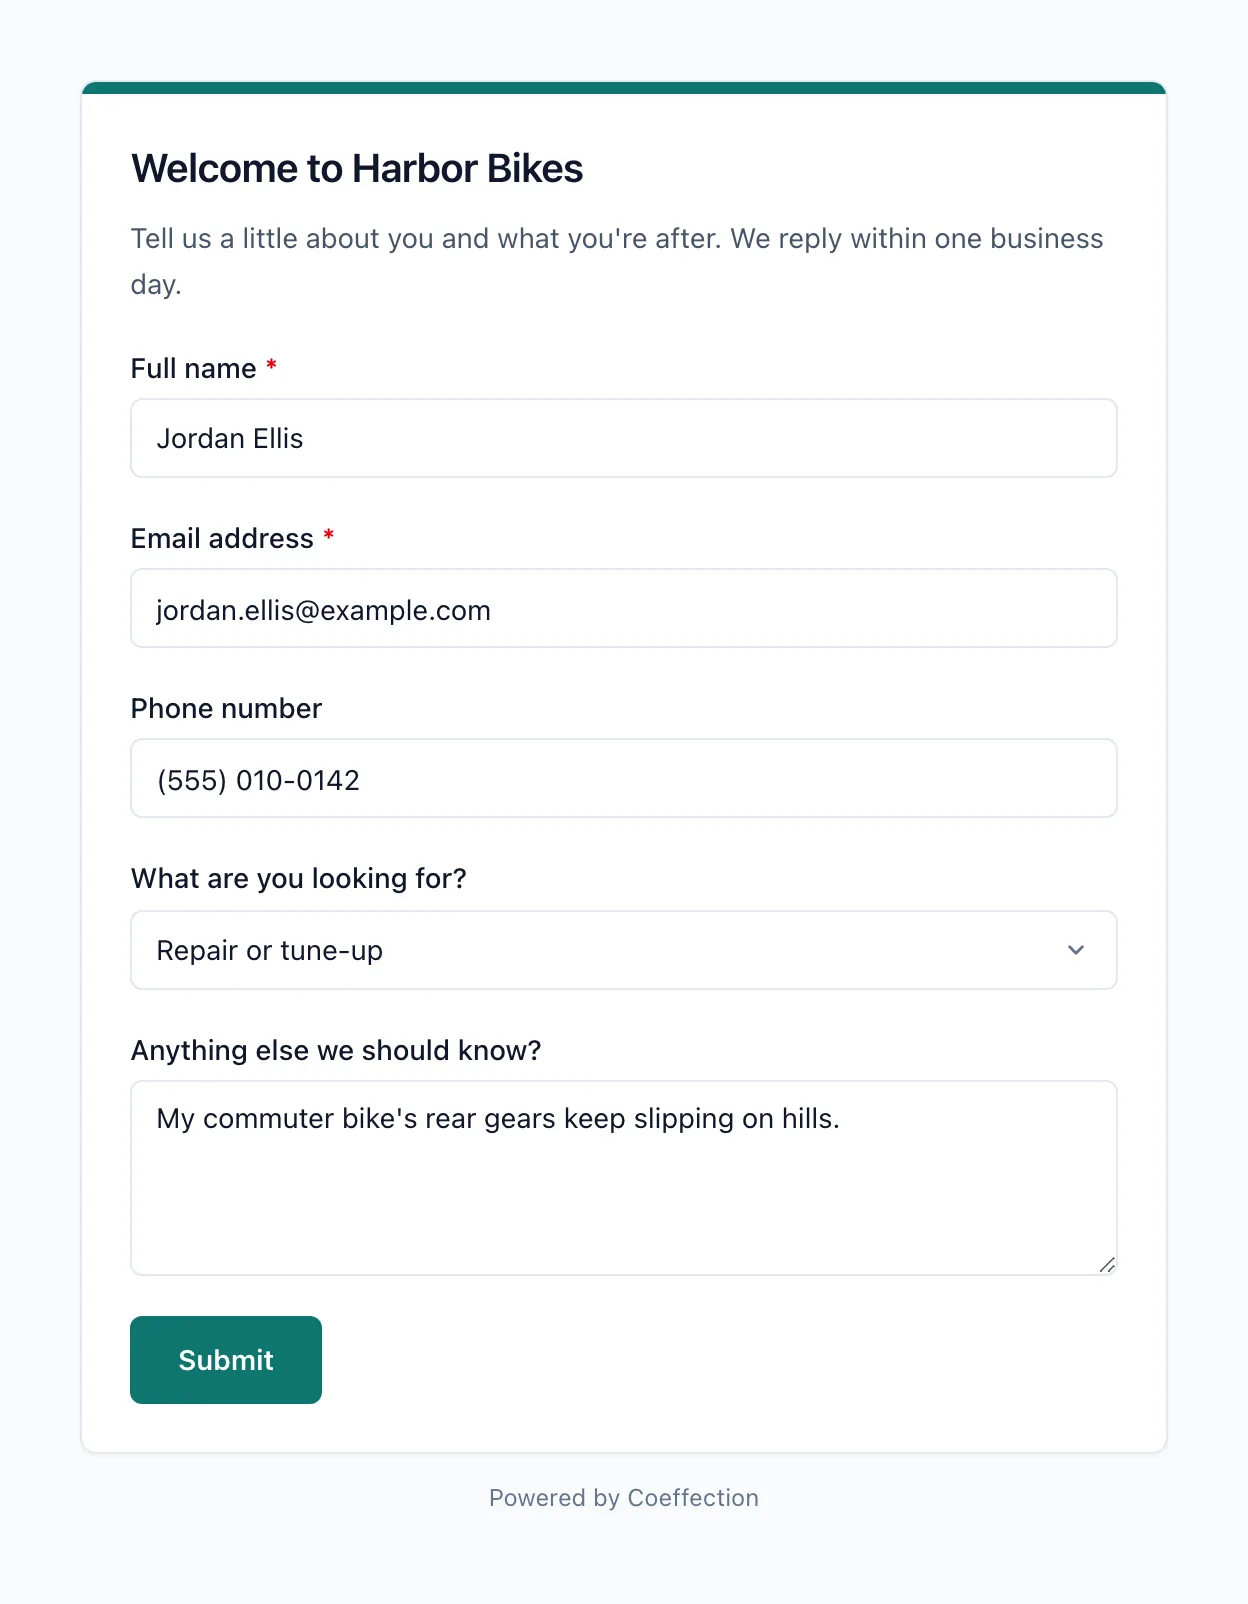
Review what came in
Every response is saved. In the form editor, click Submissions at the top (the number beside it tells you how many there are). Each row shows when the response arrived, where it came from, what happened to it (Applied means the record was created), and a link to the record. Click a row to open it. The Answers are shown with the questions as the customer saw them, and Changes made to the record lists what the response wrote into the new Lead.
Because this form creates records, each response is also a new Lead in your CRM, with the name, email, phone and notes filled in and your default owner on it. That owner gets a notification in the app, so someone knows to follow up.
Nothing is lost when something goes wrong
A response is saved even if its record can't be created. Open it, read the Action error, fix the cause, and click Retry action. You can also click Export CSV to take every response into a spreadsheet.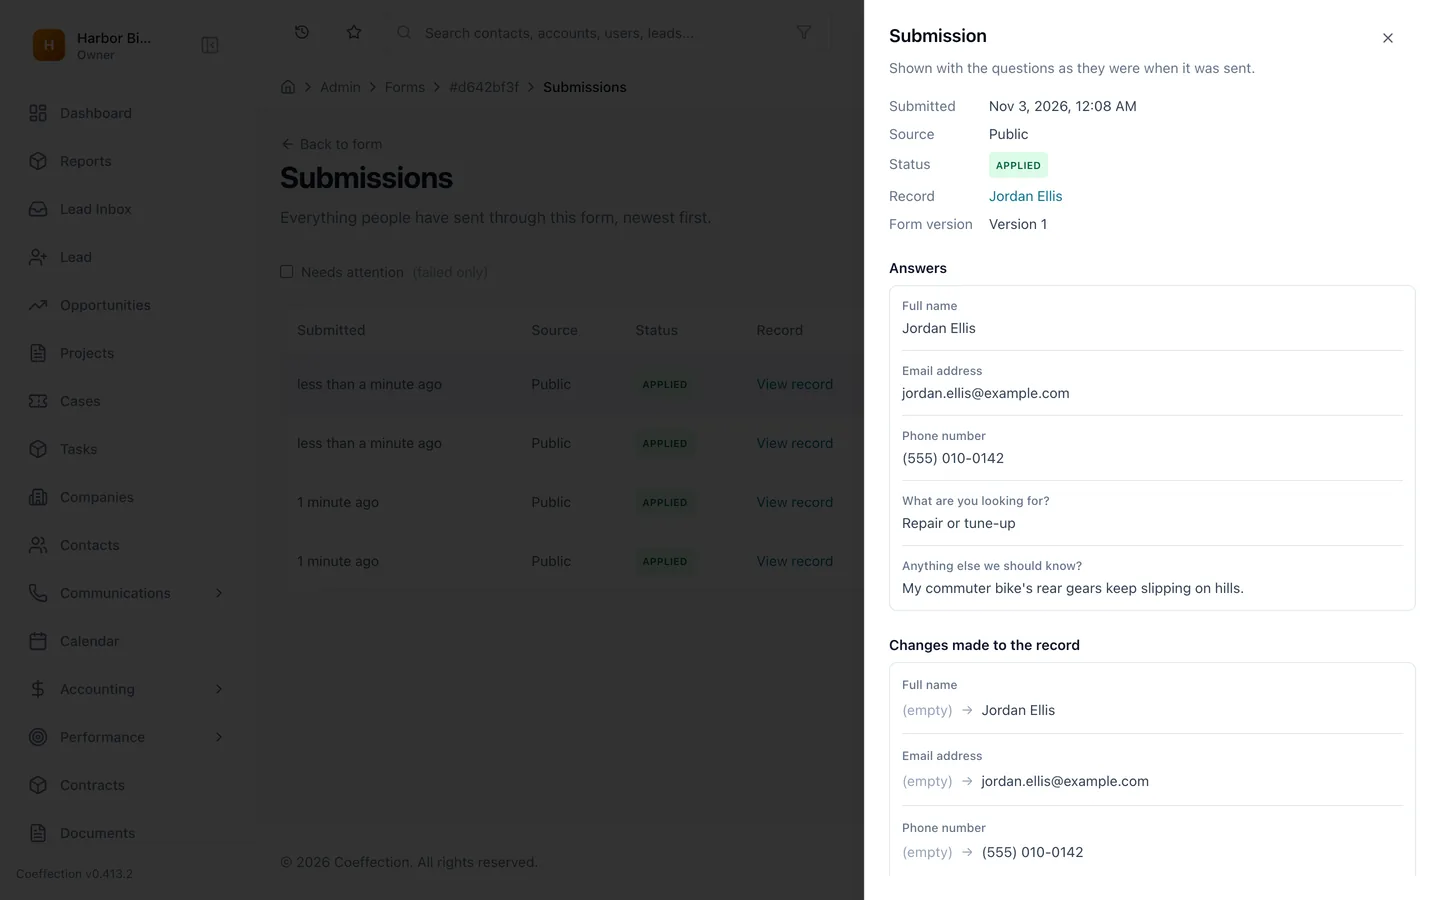
Send a private link from a record
A public link is great for new customers. For someone who is already in your CRM, use the second kind of form. Create another form with the audience Magic link (tied to one record) and the action Update the linked record, add the fields you want them to confirm, and publish it.
Then open the record, go to its Forms tab, and click Send form. Pick the Form and choose how long the link lasts: 7 days, 30 days, or 90 days. People with Read & Write access to Forms also see Never. Then either click Copy link to paste it into your own message, or click Send email to have Coeffection mail it to the Recipient email, which starts as the record's own email address.
Whoever opens the link fills in the form for that one record, with no login, and their answers update it. On a field that is saved to the record you can turn on Show the record's current value, so the customer sees what you have on file and can correct it. The record keeps a history, with every changed field shown from its old value to its new one.
Treat the link like a key
Anyone who has the link can update that record until it expires or you revoke it. Coeffection shows the link once, so copy it right away. If you lose it, revoke it and send a new one. Sending forms needs the Can send forms to customers permission, which Owners, Admins and Managers have to begin with.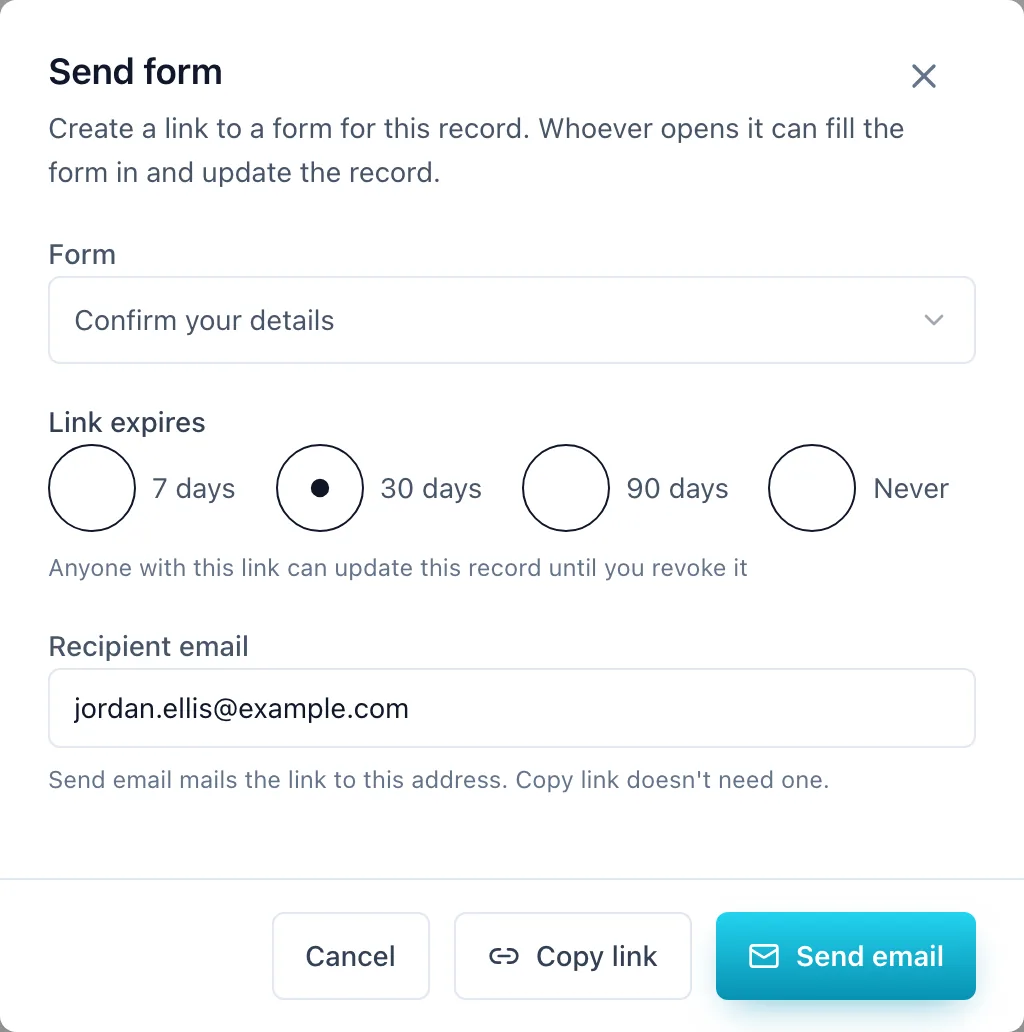
Optional: start a workflow when a form comes in
Want something to happen on its own when a response arrives? Open Admin → Workflows and create a workflow. Under Trigger, choose Form submitted. Coeffection locks the entity type for you, and a Form list appears. Pick your form there. Only published forms that create or update records are listed. Add the actions you want and save. The workflow runs on the record that the response created or updated.
A form that only collects responses
A form set to Just collect responses doesn't start workflows, because there is no record for the workflow to run on. Workflow triggers are part of workflow automation, so you will see this one on plans that include it.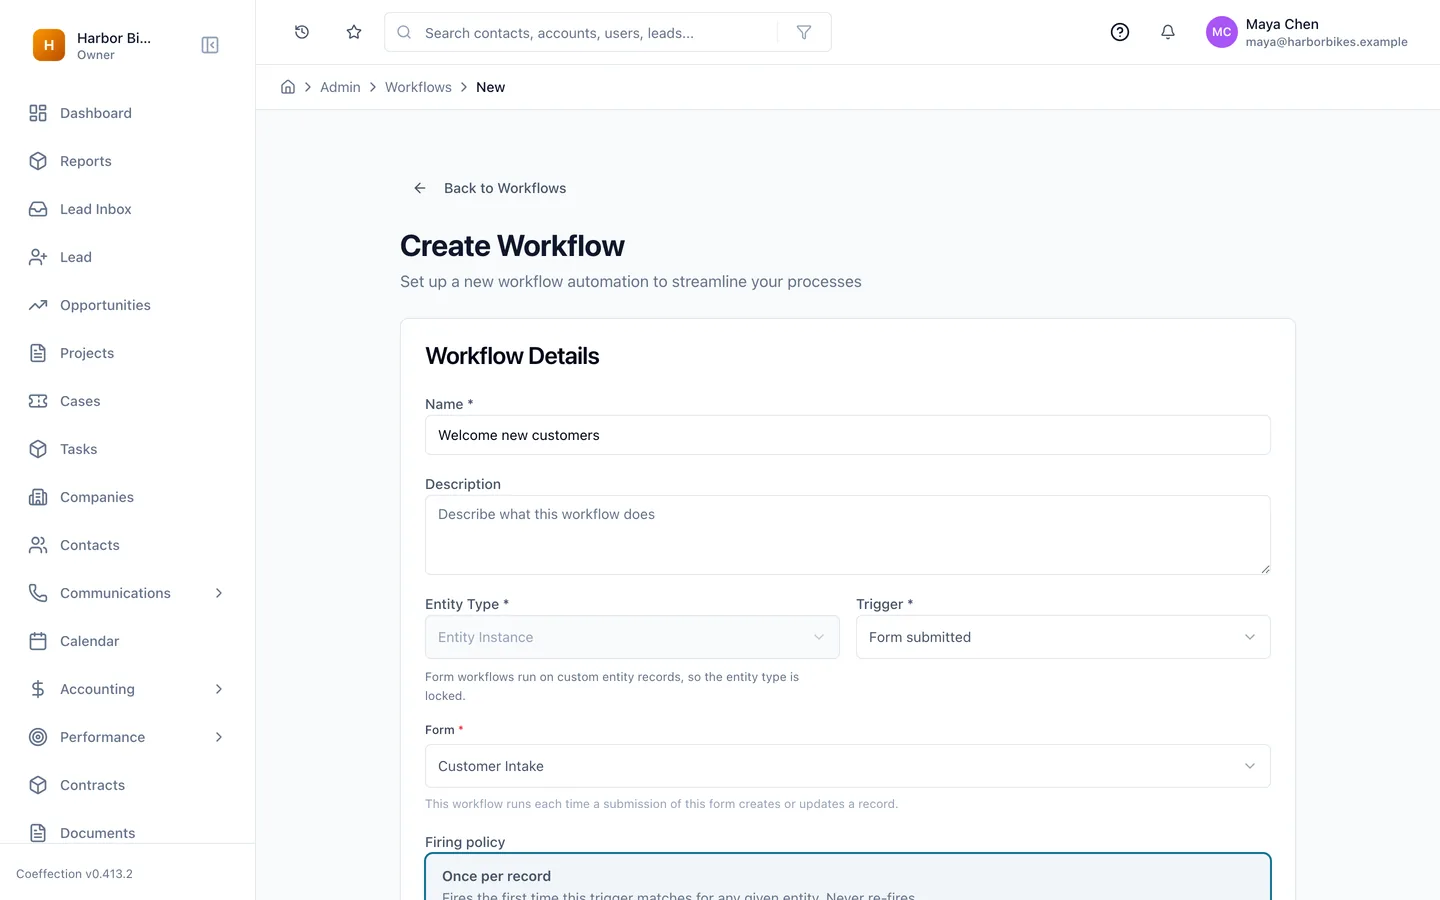
That is the whole loop, from a blank page to a live link with answers landing in your CRM on their own. For every setting, including branding, retention, permissions and troubleshooting, see the Customer Forms reference. Now that customers are filling in your CRM for you, the next step is putting that data to work. That's covered in the next guide, Build Your First Report.